What is HDR?
Have you ever showed a picture to a friend and felt compelled to say:
- "It was beautiful, but you had to be there"
Yeah, me too. The good news is: it's not you, it's the camera's fault.
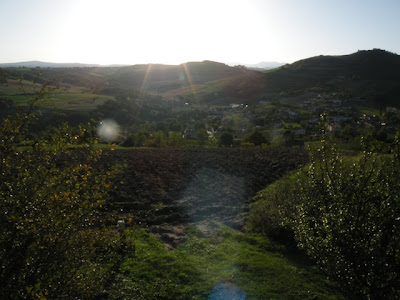
A camera is far from being as capable as the human eye to capture light. It has to make difficult decisions. When you aim confidently at the horizon to capture a beautiful sunset over a mountain range, depending in which direction you tilt the camera, you either get beautiful orange skies over a black mountain range, or a clear mountain range with bright white skies above it.
 |
| clear skies, underexposed ground |
 |
| clear ground, overexposed skies |
In the 1850s, to capture a sunset over the ocean, - and maybe impress his girlfriend - Gustave Le Gray decided to take two pictures instead of one:
- the first, with a normal exposure value, would capture the beautiful skies
- the second, with a longer exposition time, would reveal the details of the ocean
- "Beautiful, huh? Guess what? That's exactly what it looked like on the spot."
 |
| Normal picture, dark because we are facing the sun |
 |
| First HDR shot with low exposure, to capture the skies |
 |
| Second HDR shot with high exposure, to capture the landscape |
 |
| All 3 pictures assembled = HDR picture |
Simple HDR tutorial
What camera?
Any.
Any consumer camera will allow you to adjust the exposure setting, and take the required pictures manually. Some fancier products feature a shooting mode called "exposure bracketing", and take the pictures automatically, changing the exposure value between each take.
I opted for an easy to transport consumer camera with a high sensitivity sensor, the Canon powershot ixus/elph 115 HS.
 |
| Canon powershot ixus/elph 115 HS |
Taking the pictureS
To obtain a clear HDR picture, you will need to take several shots of the exact same scene. Therefore, it is helpful to use a tripod to keep the camera from moving between takes. As an alternative, you can rest the camera on a stable surface.
If your camera has an "exposure bracketing" feature, you can pretty much point and shoot, you will obtain 3 to 5 photos within the desired range of exposure values.
If, like mine, your camera doesn't have the fancy feature, simply locate the exposure setting in the menu. On most cameras, it looks something like this icon:
| Exposure icon |
 |
| Exposure selector on the back panel |
Switch your camera to manual operating mode, referring to its manual to do so if necessary, and set it on a stable surface.
set the exposure setting to -1, and take a picture
set the exposure setting to 0, and take a picture
set the exposure setting to +1, and take a picture
 |
| Three pictures for three exposure values, or "stops" |
These exposure values are called "stops". You can take 5 pictures, with five different "stops", for a more effective HDR effect. The exposure values could be:
-2, -1, 0, +1, +2.
All done, congratulations. For the shooting part that is. If you moved slightly between each take, no worries, the software will most likely be able to correct a small shift between pictures.
You may now get back to your computer, import all three pictures, and move on to the next step of our tutorial.
You may now get back to your computer, import all three pictures, and move on to the next step of our tutorial.
The software
If you own a Mac, you're in luck because a little HDR processing application called HDRtist can be downloaded for free on the website http://www.ohanaware.com/hdrtist/
HDRtist
It is basic, but will produce decent resutlts quickly. Simply select all 3 pictures and drag them onto the HDRtist window to see the HDR picture processed instantly.
Click on the button "align photos" if needed. The first time, a prompt will appear, asking for your permission to install an additional alignement plugin. Accept the offer worry-free, since the plugin is a free, open source, non-invasive feature.
Next, use the strength slider to adjust the effect and click on 'save HDR' to save the final result in a single JPG file. All done!
If you own a Windows operated computer, I was unable to locate a free HDR processing software at the time this tutorial was created but I encourage you to search the web for new developments.
Photomatix pro
The most praised HDR processing software is called Photomatix, and is available for Windows and Mac alike, starting at $39. Visit the website http://www.hdrsoft.com/ to download a trial version and allow me to further explain how it works.
Let's learn how to use Photomatix pro for now, which costs $99 but provides with countless hours of HDR processing excitement.
First open the program and click on "load bracketed photos" as shown below
Click on "browse" to select the 3 photos you just took from your hard drive, or drag and drop the files into the window as shown below
Click "OK". In some rare instances, a dialog box will inquire the actual exposure values for each picture if the software couldn't detect it. Simply set the E.V spacing to 1 as shown below:
Make the next dialog box look something like the following screen capture:
Sometimes, it will be preferable to align the images "by correcting horizontal and vertical shifts", although in most instances, the second option works just fine. If you are not satisfied with one, try the other.
The ghosting artifacts, noise and chromatic aberrations reduction features are more advanced, and usually provide better results with software in the likes of Photoshop, so we won't get into it for now.
Click "preprocess", and after a reasonable processing time, a preview of your HDR picture will appear, with a setting box in the likes of the one below:
If not already active, tick the "tone mapping" option, and set the values identical to the ones you see on the above screen capture.
If you own a Mac, you're in luck because a little HDR processing application called HDRtist can be downloaded for free on the website http://www.ohanaware.com/hdrtist/
HDRtist
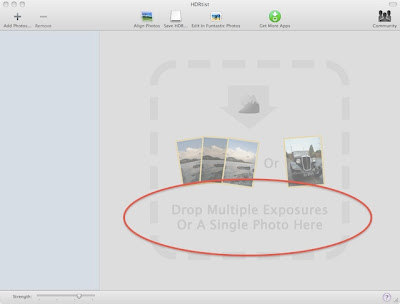
It is basic, but will produce decent resutlts quickly. Simply select all 3 pictures and drag them onto the HDRtist window to see the HDR picture processed instantly.
 |
| Drag the 3 pictures onto the circled area |
Click on the button "align photos" if needed. The first time, a prompt will appear, asking for your permission to install an additional alignement plugin. Accept the offer worry-free, since the plugin is a free, open source, non-invasive feature.
 |
| Align, effect strength and save HDR functions |
Next, use the strength slider to adjust the effect and click on 'save HDR' to save the final result in a single JPG file. All done!
If you own a Windows operated computer, I was unable to locate a free HDR processing software at the time this tutorial was created but I encourage you to search the web for new developments.
Photomatix pro
The most praised HDR processing software is called Photomatix, and is available for Windows and Mac alike, starting at $39. Visit the website http://www.hdrsoft.com/ to download a trial version and allow me to further explain how it works.
Let's learn how to use Photomatix pro for now, which costs $99 but provides with countless hours of HDR processing excitement.
First open the program and click on "load bracketed photos" as shown below
Click on "browse" to select the 3 photos you just took from your hard drive, or drag and drop the files into the window as shown below
Click "OK". In some rare instances, a dialog box will inquire the actual exposure values for each picture if the software couldn't detect it. Simply set the E.V spacing to 1 as shown below:
 |
| Set the E.V spacing to 1 |
Make the next dialog box look something like the following screen capture:
Sometimes, it will be preferable to align the images "by correcting horizontal and vertical shifts", although in most instances, the second option works just fine. If you are not satisfied with one, try the other.
The ghosting artifacts, noise and chromatic aberrations reduction features are more advanced, and usually provide better results with software in the likes of Photoshop, so we won't get into it for now.
Click "preprocess", and after a reasonable processing time, a preview of your HDR picture will appear, with a setting box in the likes of the one below:
 |
| Tone mapping neutral settings |
If not already active, tick the "tone mapping" option, and set the values identical to the ones you see on the above screen capture.
This is an average HDR setting. Roughly, the sliders can be used as follow:
- the strength slider increases the HDR effect
- the color saturation slider ranges from black and white (0) to saturated colors (100)
- the luminosity slider helps brighten an overly processed picture
- the microcontrast slider darkens the picture by increasing local contrast. Adds more details though
- the smoothing slider decides weather to use the HDR strength to add light to every area of the picture or focus on the original light source. Tick the "light mode" checkbox to use preset values
- the "tone settings" button reveals sliders meant to adjust the limits of the HDR influence
- the next two buttons aim to finely adjust highlights and shadows, and can be left aside in most instances
Experiment with the main sliders, and when you are satisfied with the result, click the "process" button to produce the final HDR picture. Save it and you are ready to share it with the world.
Additional processing can be achieved with Iphoto, Photoshop, and other products, to crop and touch up the colors of your HDR picture.
The other HDR rendering method is called "exposure fusion" and cannot be developed in this already lengthy tutorial. You will find out that each picture is different, so make sure to experiment with all the tools at your disposal.
Conclusion
HDR pictures were invented to address lighting issues in photographs, and produce images that were truer to the human eye. Today, this blog aims to expand the incredible possibilities offered by this technology, by applying it to a variety of subjects and circumstances, for your viewing pleasure.


